How to make a scene IN MAYA … quite literally
For both assignments, I had to set up the scene and build it around the characters. I used two separate FBX files, one representing an urban scene, as the original reference was filmed in the ‘Big Apple’, and the second one being a bedroom diorama more suitable for a teenager. They both had their textures already mapped, and all I needed to do, after creating their relative Maya project folders, was to add custom textures in the Attribute Editor. When experimenting with lights and shades, there’s always a reason behind position, range and intensity. I won’t be talking about shadows in detail just yet, as I would like to leave those to the ‘Maya buggy section that almost drove me insane’ (pixels, pixels everywhere!!).
lights
Probably one of the easiest things to set up at first but also one of the most unforgiving if not handled properly (I learnt it the hard way). After careful consideration I opted for ambient lights and positioned them at the back of the scenes. Then I added a spotlight for the walking cycle and a point light for the Game Cycle Pack at the front of the scene. This choice was not casual. The main difference between the two scenes is the setting. The walk cycle involves an outdoor environment, and it made more sense to have a smaller light source to create detailed shadows not only of the character but of the whole scene. The point light in the Game Cycle scene was used mostly for definition and specifically to support the ambient light that I had to keep at a minimum so the character wouldn’t look like this:
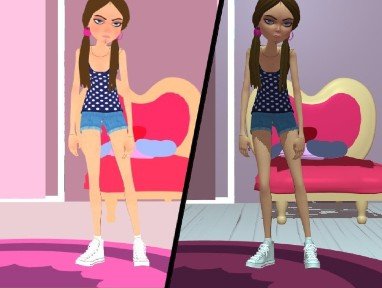
higher intensity lower intensity
cameras
Before animating cameras, it is always a good idea to inspect how they interact with their surroundings. The scene I used for the background had some minor texturing issues. Once I started repositioning the cameras, their textures started to glitch. Following instructions from the ‘Camera Animation Locomotion Cycles’ tutorial on Canvas, I managed to overcome this issue by increasing the cameras’ Near and Far plane settings.
camera sequencer
Both scenes had different animated cameras, so the obvious choice was to use a camera sequencer to direct their animations and transitions. For the walk cycle animation, I used two different cameras (front and side), while I worked with three different cameras in the game cycle pack animation (front and both sides).
referencing
Last but not least, my favourite game to play after hide and seek: referencing assets. Jokes aside, it took me a considerable amount of time to make Maya understand that I needed to use relative paths, not absolute. Referencing is also a reminder for people like me to save a copy of your project beforehand. Referencing my assets, let me link external files to the project so that there’s no need to import them again from external folders and, more importantly, It will easily let me share my projects and open them from other devices.